Showing posts with label using what we have. Show all posts

Thursday, June 4, 2020

Chopsticks, jigsaws, cordless drills, and soap: Thinking of you in the bathroom . . .

Let me explain this thing in the picture below.


I wrote to my friend the Grasshopper recently, saying,

"Thinking of you in the bathroom . . . "

. . . specifically, every time I open the bathroom closet where we store shaving stuff, extra toothpaste . . . and three bars of soap you made.  (The fourth is on the counter).  My bathroom closet smells so good now, and whenever I open it, I get a wonderful whiff, and think of my friend.

My friend makes soap (if you can't tell), and I'd bought four different flavors (if that's what you call them) about a month ago. mmm, but they smell great. She wrote back to say, in part,

I am so glad you like the soaps!  They will last a good long time if able to drain well; do you have a soap lift, those little silicone bumpy things?  They really, really help!

So, no, I don't have a bumpy silicon thingy.  Alas.  I do keep the soap in a square orange bowl that mostly keeps the soap upright (and hence, largely dry).  But I heed the advice of my lather-wise grasshopper, and I've jonesed over my sister's wooden soap rack for a bunch of years.  So I decided to make myself one. 


I was fortunate to have a couple of extra pairs of chopsticks lying around (I'd rescued them from somewhere -- I'm trash-averse enough that I bring my own metal pairs to restaurants, so not exactly sure where these came from).  For the support bars, I first tried to cannibalize paint-stirrers, but they split apart whenever the drill touched them, so after a few tries, I gave up and went to bed.  
The next morning, I located another small-ish scrap piece of wood that didn't mind the cordless drill as much (and after all, it's an awesome cordless drill!)  So I made the holes first, and then jigsawed the two even-smaller blocks off the smallish, hole-y scrap.   And then I squeezed everything together.  


This lovely little soap rack fits perfectly in the bottom of my orange bowl (phew for measuring correctly!) And so now my soap -- which smells sooo good -- has its own breathing space. 


Monday, May 20, 2019

I *finally* made a drill bits holder (old t-shirt version)

I guess different people lust after owning different kinds of things.  For about two years now, I've been admiring the homemade Root Simple drill bit organizer (made with a 2x4 block of wood and a sharpie).   I haven't made it for myself partly because I didn't happen to have a right-sized block of wood hanging around the house, but also because I tend to use my drill on the go, not in the shop.  But I really, really admire the elegance of this holder, which seems obvious in retrospect but clearly eluded me most of my life.

Mr. Homegrown of Root Simple made his organizer because his drill bits kept rattling around in his drawer.  I lusted after a better drill bit holder for myself because I hate my metal drill bit holder. The bits slide down and mess with the hinges to keep it from opening the whole way, or else -- once I've finally pried it open -- they slide down and mess with the hinges to keep the contraption from closing the whole way.  I spend way too much time wrestling with this holder.
Drill bits in an awkward holder


So.  I made a drill bit holder out of an old t-shirt.  Figuring out how to fold this over so that the heights of the pockets would work out okay was a small geometrical challenge, but a bit of fiddling helped things to come out right, and then I pinned the heck out of everything so I could sew all the pockets in the right place.  The sewing was easy and even a bit therapeutic.  In homage to Mr. Homegrown (and also because, labeling!), I used a sharpie to mark the sizes of the bits.
Drill bit holder made of an old t-shirt, with labeled slots

I also attached a velcro strap to one end, so now I can roll the whole baby up and close it, so that I can chuck this in my portable drill bag without worrying about losing my bits.
Sewed-on velcro strap to keep it closed.  
This is a small happiness in the land of Miser Mom.  yay.


Monday, May 14, 2018

Wenches with wrenches, for Mother's day

Okay, I know that I'm not exactly mainstream when it comes to gift giving.  I wasn't really terribly surprised, then, to hear that my daughter's best friend was horrified and offended by the Christmas present I gave my daughter.  What kind of mother would give her kid radiation sickness pills for Christmas? she wanted to know.  (Um, . . . maybe the kind of mom who doesn't want her daughter to die from radiation poisoning?  I mean, that would be my answer.)  So, yeah, maybe not all parents give their children emergency preparedness kits as a way of saying "Happy Holidays".  I get that.

Although I do think it was an awesome gift, and kind of funny, too. 

I tread carefully when it comes to gift giving, because I really don't want to spend money on stupid excessive waste that just adds to landfills, or promote mindless consumption of non-renewable resources.  On the other hand, I don't really want to go around offending people either.   So it was with a bit of trepidation, a few weeks ago, that I asked I-daughter what she wanted for her upcoming birthday.

She didn't even hesitate one second.  "I'm SO glad you asked!"  I heard this and wondered if this meant I'd be headed for the mall for the first time in . . . I dunno, a decade.  But instead she said, "One of the boards in my back porch stairs is starting to rot, and I was hoping you could replace it."

A birthday gift for my daughter: a new stair tread.
K-daughter, sitting nearby, overheard this and immediately joined in, "Oh, now I'm jealous!  That's the kind of thing I want to ask for, but I don't have back porch stairs that someone could fix."

So, apparently I raised my daughters right.  Or at least, right for me.  Yay!

It turns out that I-daughter's front porch stairs also need to be replaced, and we turned this into a Mother's Day gathering.  Eventually, we'll need to get new lumber and replace the whole set of stairs, but this past Sunday the three of us gathered to take measurements and shore up the existing stairs to make things more steady.  The old fence around my yard that I dismantled a few years ago keeps being reincarnated in new forms; the latest form is porch stairs, apparently.

Me watching K-daughter use the
circular saw.
I think I really look like
*my* mom in this photo!
It was good to be together.  K-daughter loves to work on projects with me, and so I led her through using the circular saw, and the cordless drill, and -- because the battery on the cordless drill died -- how to use a chuck to switch out drill bits on a very old but very serviceable corded drill.  (It is possible that my daughters might have gotten future Christmas gift ideas from this experience, but I'll let that be a surprise to me and/or others in the future.)

It was also good to futz around with an imperfect repair before we bought supplies for the replacement steps.  We spent no money, but got valuable insights that will help make the eventual, more permanent stairs, better (the ground slopes so the supports need to be at different heights, etc).

I-daughter says that her neighbors have priced out getting a new porch roof (she'll go in on this with them, because it's a duplex and therefore they share the roof). She says they also priced out getting new porch stairs, and the estimate was $2000.  So I could do the whole yada-yada thing and say I gave her one of the most expensive gifts blah blah . . .

But really, the gift was a big mutual one.  It's the gift of time we spend together as a family, even with my "kids" grown and out of the house.  It's the gift that we actually like spending time together, which is kind of a miracle, I figure.   It's the gift of getting psyched about using power tools, or about finding needs that we can somehow fulfill.  It's the gift that my daughters give me by loving me for who I am, mall-phobic and all.

I-daughter and K-daughter on the stairs, with my fancy
"construction vehicle" in front.


Monday, April 2, 2018

A thirty-year-old towel

We're not throwing in the towel; we've mended it.

My husband came to me with a blue towel he's used for his showers, showing me a large rip in the middle of an even larger threadbare patch.   "Can you fix this?" he asked.

I mean, I could fix the hole, but to do so I'd have to add a patch.  And given my currently available patching materials, the patch would be pretty ugly . . . on a towel that's frankly pretty old already.  I could patch it, I told him, but scrapping the towel and using a new one probably made more sense.

He nodded his head, and put the towel aside.

And then a few days later, he showed me the towel again.  Could you fix this? he asked.  At this point, I realized the towel was more than an object.  I asked him about it.  He's been using this towel for 30 years, he told me.  My mind boggled . . . but then I thought about how much I love using and reusing the large yellow towels my mom got for me when I graduated from college . . . about 30 years ago.  We're a pair of 30-year-veteran-towel users, apparently.  Our towels are older than our kids, and we're not getting rid of our kids when they get a bit banged up, so why get rid of the towels?

So patch-and-mend the towels, it is.  As promised, the patch is ugly, or at best highly visible. I sacrificed a blue terry-cloth kitchen rag that I'd made many years ago from a discarded bathrobe: I cut off the hems and zig-zag stitched it to my husband's towel.  I then flipped the towel over and zig-zag stitched the tear in the towel to the rag.

The time and effort involved was minimal -- I think that patching the towel took maybe 5 minutes.  This was definitely faster than buying a new towel (not to mention exponentially cheaper).  When I was hesitating, it wasn't because I was reluctant because of time or effort; I was reluctant because of aesthetics.

See the scar?  Not too bad from this side.
But aesthetics be hanged.  Now my husband has his towel back, with a scar on one side, and a blue diamond on the other.  It's not lovely to look at, but it's familiar and comforting.  My husband is glad to have his old favorite back in use, and that's worth a lot to both of us.


Monday, October 9, 2017

When you can't see the kale for the pickles

When I was growing up, everyone in my family took turns at making dinner.  My mom actually had me -- the artistic one, apparently-- design a KP chart*, so we knew who was cooking dinner, who was washing dishes, and who was vacuuming and sweeping each day.  (Okay, we "only" vacuumed and swept the house 3 days per week, one day per daughter, but the KP chart said which one of us did it which day).
*KP is an army abbreviation for "Kitchen Police",
or in my mom's lingo, a Girl Scout abbreviation 
for "Kitchen Patrol".  My mom was organized and strict!

It was sort of an ongoing joke that my mom's meals consisted of leftovers.  In fact, she'd pull a chair up in front of the fridge and pull out pyrex container after corningware container.  She'd reheat those containers in the oven or the microwave, and that would be our meal for the evening.  My sisters and I grumbled a lot about the fact that we and our dad had to cook, but my mom got to reheat.

But the scavengers have a place in the ecosystem, too.  And every once in a while, when I clean out my own refrigerator, I'm glad for the chance to have a "grandmother meal", which makes the most of former meals before they go bad, and also allows me to see what fresh foods still exist in between the bowls and and plates and pots of stuff.

Problem is, my refrigerator is usually in the state where there's "no food, only ingredients".  My love of canning jars and all that goes in them means that we tend to accumulate lots of jars of something-or-other waiting to be made into dinner somehow.  Just last Friday, in fact, we'd reached a stage where I knew I had a head of kale in there somewhere, but I couldn't see it for all the mis-matched jars of olives, diced carrots, sliced turnips, and other potentially yummy vegetables that had yet to find their way into a meal.  Not to mention, we had lots of partially filled jars of sauces cluttering up the refrigerator door.  Some people can't see the forest for the trees, but I couldn't see the kale for the pickles.
Where, oh where, is the kale?

So I pulled a Miser Mom version of my Mama.  I emptied the shelves of the refrigerator onto the kitchen counter, and I concocted a recipe made of . . . well, of ingredients.   I gathered all the root vegetables and tossed them into a hot cast-iron skillet with oil, garlic, and salt.  I consolidated as much as I could of four bottles of barbecue sauce into one bottle.  The remaining three bottles, I added a bit of water to, shook for all I was worth, and tossed the liquid in with the root vegetables (thereby simultaneously rinsing those bottles before recycling them).  I added a jar of sliced mizuna stems and a bunch of arugula.  I added pretty much everything I thought my husband or son wouldn't want to cook with, and I returned to the fridge the few remaining jars or bowls of things my guys might actually use -- the tomatoes and (yes) the kale.

I love it that the recipe was accidentally awesome.  I made it just for me because I figured no one else would like it.  But when my husband and son got home later that evening, they snarfed it all down and there was none left for me to take to school for lunch the next day.  Huzzah for serendipitous recipes!

But I also continue to appreciate the magic of canning, so that I can store the bulk of my food on non-refrigerated shelves.  On  shelves,  I can see all of my stored food easily.  Finding food in the basement is so much easier than finding it in the fridge or the freezer.  So here's a shout-out to my daughter and her best friend, who came over later in the week (long after the danger of being served Hot Barbecue Root Vegetable Medley), and who helped me cut up apples and can 24 quarts and a dozen smaller jars of applesauce. 

Twirly apples are one of the most enjoyable things about
spending 4 hours canning applesauce.
Even after we canned all those jars up, I had a few more bags of apples left for eating.  Fortunately, I'd cleared out space in the fridge for the remaining apples; they go right next to the kale.

Monday, September 11, 2017

My green sweater

I snagged a cute green cardigan at our College's annual end-of-year yard sale.  This sweater passed three important Miser Mom tests:
  1.  It was essentially free.   I did work something like 6 hours at the yard sale, but I would have volunteered even if I didn't get to do a bit of "shopping".  
  2. I'd actually been itching to get a light button-up sweater; it would fill a gap in my wardrobe (as opposed to being redundant).
  3. It matched my travel scarf (or rather, didn't clash with it too badly), thereby fitting into the color palate of "everything matches everything" that has made my sartorial life so much easier these past few years.
Sometime last week, the fall-like weather seemed to call for wearing a cute new (to me) sweater.  That's when I realized -- alas -- it had developed a small stain.  Darn.  

So I tried scrubbing the stain.  No luck.  Then I tried spot-bleaching the stain . . . which worked, in the sense of removing the stain, but failed in the sense of creating a big white bleach spot. I nearly gave up and put the cardigan in the "rags-to-recycle" bin, but then I thought, what the heck, might as well see what happens if I just bleach the whole thing.  I soaked the baby overnight. 

So now I have a darling pale yellow cardigan, with green-tinted buttons.  And still nothing has ended up in the landfill, so in that sense, my sweater is still green. 

Yay.


Friday, June 9, 2017

Making a dog collar

This little post is really an homage to my sewing machine.  Well, to my sewing machine and also to my stash of saved zippers and straps, rescued from the plethora of giveaway-bags that my husband picks up at conferences.  Those conference bags are usually made of a nasty material, in completely the wrong shape for hauling groceries or other substantial items, but the zippers (if there are any) and the nylon straps are usually pretty durable.  Better yet, because the construction on those bags is so flimsy, it's usually a matter of one or two minutes to remove the zippers with a seam ripper.

Somehow, in the most recent months we seem to have lost our dog collars. So when we went to get our new dog, Prewash (who is really an amazingly wonderful dog, by the way), I knew I'd need to get a new collar.  And me, thinking about buying a dog collar at an actual store, it's a bit like a stereotypical dad balking at the price of his daughter's bikini:  So much money for so little fabric! I mean, since I already refuse to pay more than $1 for a pair of jeans, then why should I buy a little strap for my dog that costs an order of magnitude more?  That'd be just nutso.

Prewash showing off her bikini collar.  
For less time than it would take to drive to a store, I could pull out my collection of nylon straps and clasps, pick out one about the right size, and trim and stitch it.  You can't see it in these pictures, but I stitched one extra small loop in the collar, and used a key ring through that loop to attach her dog tags.

Looking closer at the collar . . . 

Being not overly fashion conscious, especially when it comes to my dog, I didn't even bother to switch the thread on the machine to black, so the collar has a little splash of color.
. . . and closer yet.  You can see my orange/red stitching.

In the grand scheme of things, of course, making my own dog collars isn't a grand money saver.  But the sewing machine is --- even more, the habit of thinking about sewing is.  I've repaired all sorts of clothes, backpacks, bags, towels over the years, freeing us from having to spend money to replace those things (and putting the broken/busted things back into general use instead of sending them to the landfill).  I've made my own purse/bags, tool holders, mesh produce bags, and (very occasionally) clothes.  The habit of thinking "can I whip this up myself?" is a great one to have, especially when the answer turns out to be "yes".

As it was in this case.  Huzzah for a quick collar, and also for a wonderful dog to wear it!

Thursday, May 11, 2017

Getting into a pickle (juice)

Vegetable season is upon us.  Our CSA shares have started rolling in again.  Huzzah!

Of course, together with an abundance of vegetables comes an abundance of vegetable preparation.  I've said before that I've become a fan of trying to chop and store the veggies right away so that (a) they don't wilt before we get to them and (b) they look like snacks or dinner or lunch, instead of like potted plants taking up space in the fridge.

Here's one of my fave helpers these past few weeks:  two jars of pickle juice, left over from purchased pickles my husband and sons like.


The reason that one jar of juice looks red is because it held radishes for a while (and then we ate the radishes).

Pickle brine is wonderful for a few reasons.  One reason is that the combination of vinegar and salt (mostly the vinegar) serves as a preservative, keeping the food from going bad.  The traditional use of pickling is to preserve summer food long into winter, but it also works for preserving Tuesday food well into the weekend.  At any rate, my radishes never got soggy or wilty, even though I left them in the jar on the counter for several days before we actually got around to taste-testing them.  (In fact, leaving them out on the counter is better for pickling them than sticking them in the fridge).

The other big reason that pickle brine is wonderful is that pickle brine adds taste, making veggies even more yummy.  People love acidic foods (soft drinks being a prime example of this preference gone bad), and salt is so danged good it's become a Biblical metaphor for awesomeness.  Plus, there are a few other sugars and spices in the commercial pickles that just add to the overall flavor. I don't think that any of my kids or husband would have looked at a bowl of sliced radishes and thought, Yum!  Snack!  But pickled radishes are actually quite munch-able.

If you're a pickle neophyte, you'll be happy to hear that learning to pickle foods is like learning checkers: the basic rules are so easy anyone can start playing, but if you're super serious, you can get more complicated.  The basic rules of pickling are these:
  1. wash and cut up the vegetables
  2. put them in the brine.
That's it.  As you learn more about pickling you learn things like, the flavor deepens if you wait a few days; you can speed-up or enhance the process by heating the brine properly (one recipe I saw suggested leaving the jar on a sunny window sill for the first day); you can muck around with spices; etc.  But since all I want to do is to have my CSA vegetables wind up in people's tummies instead of on the compost heap by the end of the week, steps 1 and 2 are just perfect for us.   I'm not going to go all radichal with my radishes.


Wednesday, April 19, 2017

Garbage offsets

This post isn't about tomatoes.  Still, I want to show you how happy my tomatoes are, enjoying their recent field trip outdoors.
Tomatoes in the sunshine.
I've started them in canning jars, per my usual custom, because (a) I don't want to spend money on plastic starter trays, and (b) plastic starter trays are so small that they require up-potting the plants anyway and (c) I already have gobs of canning jars just sitting around, and (d) this hasn't resulted in tomato genocide in past years, so I figure why the heck not stick with what's worked?

In the same way that I'm too cheap to buy plastic starter trays, I'm also too cheap to get grow lights, and even when I borrowed grow lights, I was too cheap to leave them turned on.  (Sometimes it's hard being a Miser Mom; I get a little too wound up about leaving on the lights).   But my high-E windows mean that my tomatoes languish without additional help, making the transfer from jars to the ground problematic, unless I give them a way to get full-spectrum light.  So during April and early May, whenever the weather is warm enough, I take my tomatoes outdoors to play during the day, and then bring them back in at night to protect them from cold and/or rain.
The tomatoes in their new "school bus",
hanging out with the violets.
What's different this year is that these field trips have a new tomato school bus, so to speak. Instead of carrying my tomato-canning-jars around in their cardboard boxes (a dozen to a box), I now have a fantastic wooden basket with handles that just perfectly fits all two dozen jars. This box is a most excellent acquisition, because not only does this box allow me to carry all the jars out (or back in) in one trip, but it also means I don't have to worry that errant rain will destroy my storage boxes by making them soggy. I love my new tomato school bus.

And where, you might ask, did I get this wonderful box?

From my neighbor's trash pile.


My neighbors, they throw away such amazing stuff.  Here I am, agonizing over two tortilla bags that go with feeding 8 people at our family's annual money dinner (internal monologue: "Is there  any way I can buy green tortillas around here without plastic bags?"  fret, fret, fret . .  ).  I obsess over eliminating material that is designed exclusively for the purpose of being disposed of.  And my neighbors, their trash piles contain object after object that remains perfectly useful . . . just not useful to my neighbors.  I've rescued I-don't-know-how-many beautiful wicker baskets, art canvases, flower pots, pieces of furniture, children's toys.   Just the other day, I pulled out a tea kettle.

This gets me steamed.
The kettle is in perfect condition.  But my neighbors are renovating their kitchen, and apparently the kettle no longer fits the decor.  I admit I don't need a kettle either, but I couldn't bear the thought of this thing taking up space in our increasingly overflowing landfill, so I grabbed it off the top of their trash pile and added it to our "donate" box.

To be more specific, I added it to our "donate -- household goods" box.  We have donation boxes for household goods, for clothes, for books, for scrap metal, for rags, and for arts and crafts, all near our garbage can, which is slowly-but-surely filling up for the third time this year.  I saw the level in my own garbage can rising even as I rescued the tea kettle from my neighbor's garbage, and a thought struck me.

If companies (and even individuals) can buy carbon offsets from other sources to make up for their own excesses, maybe I could use garbage offsets to make up for my own landfill contributions.  What would happen if, for every garbage can my family produces, I rescued an equal amount of perfectly good stuff and got it into the hands of people who could use it?  My net effect on the local landfills could be zero, even if I'm not technically zero waste myself.

I want to be clear that I know I sound like a zealot and/or crazy person saying all this. I don't actually root around in other people's garbage cans, and I'm not about to start doing that now, nor in the future.  (I've only rescued the stuff in plain sight, left on the top of the can or on the ground next to it).  I don't actually want to structure my life around being the Don Quixote of Garbage, riding off to tilt at trash cans every garbage day.

And yet, the idea of having a net-zero effect on our landfill appeals to me.  If I can't quite figure out how to avoid the tortilla bags and other soft plastics that seem to make up the bulk of our garbage, maybe I can help see to it that our garbage has a little less companionship as it heads off to its final resting place.

It's something to think about.

Monday, April 3, 2017

Building a new house (for the birds)

For the past few years, our backyard birds have made nests in the lamp by our garage.  This is not very good for the lightbulbs, which keep burning out; I'm pretty sure it's not great for the birds either.  I had made a note to myself to make the birds a better house this year, but apparently I didn't get started early enough because on Sunday morning, the light fixture looked like this.


Fortunately, the weather was fabulously beautiful, and I had a spare bit of time.  So it was a great day for a bit of hacking and pounding!

In addition to a bunch of time, I had an old fence board (from the same fence that gave me Adirondack chairs and Solar dehydrators) -- this same versatile fence might as well also become a bird house.  Mark it up . . .


. . . go to town with the circular saw.  Then grab a canning jar full of old nails, rescued from previous projects . . .
. . . and whack things together.  Great therapy!


Once I finished the house and hung it up, I moved in the "furniture".  With any luck, the birds will agree to the ReLo.

And just in case, I bagged up their old home in plastic, to discourage illegal entry.

It's so much fun to bang things together, especially if I can use supplies I just happen to have lying around.  First garden project of the season -- accomplished!


Monday, January 9, 2017

De-cluttering the lotion mosh pit

An odd thing happened to me a few weeks ago.  I got into a funky mood in which I wanted to clean things up, to declutter . . . but there was hardly anything to clean.  I wouldn't say my home is an example of minimalism, because we still have lots of decorations and toys and books and tools around the house, but when I looked around the living room, dining room, and kitchen, I was really happy with everything I saw.  I'd done a major reorganization of our first floor a few years ago, and apparently, it's worked well.  I guess I've been getting really good at heading towards "enough".

But I know that real clutter is like cockroaches -- it doesn't like to be out in the light of day.  The stuff that we see is the stuff we use.  Said another way, the stuff we don't need is not the stuff we keep out in plain sight; it's the stuff at the back of our cupboards.  So after wandering through the house, eyeing all my belongings and realizing that I actually liked everything I could see, I headed upstairs and decided to get rid of stuff I couldn't see.

When I got to to the bathroom closet, I hit the jackpot.  This particular bathroom has been the primary grooming spot for five different teenage girls over the past 20 years.  All of those teenage girls have now moved out of the home, but a cursory archeological dig through the closet unearthed evidence of their past presence.  I pulled out bottle after bottle of facial scrub, eye make-up remover, and other such concoctions.

lotion in bottles, and bottles in a basket
When my four daughters were here for Christmas, I encouraged them to take what they wanted now.  Most of the specialty stuff left the house with my daughters.  Yay!  By the time my offspring were gone, what remained was two baskets: one with several bottles of sun screen, and one with an assortments of lotions.

Ugh.  The tyranny of lotion bottles.  How the heck do we get so many lotion and sun screen bottles?  I mean, we do use lotion, and sunscreen too, so I understand why we have lotion and sunscreen.  But the vast number of different semi-empty bottles of the stuff was what was screaming "clutter!" at me.  The stuff inside is useful -- but who needs all the packaging that goes with the stuff inside?

Canning jars to the rescue.  Because.  Because I love canning jars, and I miss writing about them.

I emptied what was inside the four bottles of sunscreen into a single, cup-sized canning jar.  (For thick gooey versions that didn't want to flow quickly, I stuck the bottle in the microwave for about 15 seconds; that seemed to get things flowing beautifully).  Last year, K-daughter gave me a pump that goes on a canning jar, and so now I have the sunscreen all together in one easy place to get to.
Baking soda, lotion, and sun screen: my morning ablutions.

Ditto with the lotion; that goes in another canning jar (although no pump on that one).  All of these go on my dresser, which is where I actually use them.  Every morning I use lotion and baking soda as my deodorant, and then I put on my rosacea medicine and a bit of sun screen.

(Just to add: I was surprised at how little space the sunscreen took up once it was outside of the plastic containers -- those four big semi-empty bottles all condensed down into one little canning jar.  So now I'm even happier that I thought of this -- that's a huge reduction in shelf space).


So now, the next time I get into one of those gotta-clean moods, I'll have to dig even deeper.  Because my bathroom cupboards are looking pretty danged good.  Sigh

Sunday, September 11, 2016

Surprising watermelon run

Something strange happened in my yard this last month. The something strange looks like this: a weird green rock rose up out of the earth.  A sort of stripe-y rock.

Looking closer, it seems that the green rock might actually be a watermelon.  


How could that have happened?  Every year, I bury a bunch of watermelon seeds in the ground where they can return to the dust from which they came, and where they provide useful nutrients for the various nearby weeds that I end up growing.  But this year, instead of decomposing gracefully beneath the ground, the seeds shot up curly leaves that took over their patch of the yard, and then a watermelon-like object  appeared.


But was it actually  a watermelon?  And if so, was it ready to eat?  I had no idea, but I decided to find out, and I enlisted the help of my running buddies.  After our weekly Saturday 10K run -- this week a stunningly hot week at 90 degrees -- we gathered to cut this rock open and see what it looked like on the inside. 


Lo-and-behold, it was delicious!  And there was enough to go around for runners and grandchildren and passers by, too.  Yes, the weather has gotten hot again . . . but after the run, we rocked it with watermelon!

Friday, August 19, 2016

From fence to canning jar shelves


This  little essay could be called
"Reason #167 I love my cordless drill".  
In between preparing my syllabus and going to all those bazillion meetings that seem to pop up just before the beginning of a semester, I love the feeling of ripping wood apart and putting it back together in new configurations.

The fence that has come apart has been coming back together in a variety of useful new ways.  Like, as a solar dehydrator. And as Adirondack chairs.  But also, most recently, as shelves for my empty canning jars.

(We had had shelves for the spare jars before, made out of cinderblocks and scrap wood, but because of recent basement renovations including getting a new hybrid electric water heater, those shelves had to move.  And once we moved them, we realized they were falling apart. Plus, they weren't really exactly the right size for canning jars -- sort of space-inefficient plus saggy -- so making a new set of shelves is like a basement upgrade.)

At any rate, I started with two-by-fours to make a pair of ladder-y things, with the rungs spaced 9 inches apart, which happens to be just about the right separation for storing quart-sized canning jars.  The circular saw was my first friend, to get all the pieces the right size. But after I was done with the circular saw, I pulled out my BFF, the cordless drill, and started forming strong attachments.

First I made two ladder-like things. Then I stood the two ladders up with diagonal braces while I attached the fence boards-cum-shelves.

The drill: it stands at the ready.

And here are the completed shelves, empty.   (Note the diagonal brace on the back, to add stability.  The mathematician in me loves how useful triangles are!)

Here are the shelves with boxes of empty canning jars.  The quart-sized jars near the bottom of the shelf have almost no head-room (as I designed--perfecto); the pint-sized jars in  the middle have a bit of space above; the one-cup jars fit double-stacked.  This will store a lot more jars in a lot less space than before, and it also keeps everything nice and visible. I'm so happy with how this came out. 


**
More up-cycling is happening in here.   If you look carefully, you'll see a printer box in the middle.  I love using printer boxes for storing things, partly because they're free and abundant, partly because they're recyclable once I destroy them, and partly because they're so easy to cut down to make handles or visible openings.  I've discovered that if I cut them right at the top of the flap that folds up, they're the perfect height for quart-sized canning jars.  This means I can store the jars with a printer-box lid on top, which will help even more with keeping basement dust and dirt out.


Tuesday, July 26, 2016

How I made my own Adirondack chairs, in 113 easy steps

Step 1.  Take apart an old fence with your son.  Save the boards.  

If you have the choice between stabbing yourself with a rusty nail while you disassemble your fence, or not stabbing yourself with a rusty nail, I can say I've experimented with this choice, and I'd favor "not".  But y'know, if you do go with the self-stabbing, then steps 2--6 involve washing the wound, bandaging the wound, checking medical records to see when your last TDAP vaccination happened, reading medical websites obsessively, and possibly getting a tetanus booster.

Step 7. Go over the boards again and double-check that all the nails are truly out.

Step 8.  Inspect the boards for nails again, one more time, because hey, it's faster than repeating steps 2--6.

Step 9.  Locate an Adirondack chair that you like.

Steps 10-12.  Steal it.  Or at least, borrow it.  I loaded a chair from our college green onto our garden cart (step 10), bungee corded it onto the cart (11), and wheeled it home (12).

Step 13.  Confess.  Right after I got this chair home, I got a call from our campus public safety office.  Guilt!!!!  I confessed to taking the chair and promised I'd bring it back in two days.  It turns out, they were just calling me because I'm the advisor to our campus Inter-varsity Christian Fellowship, and they knew somebody who wanted to get involved.  But the officer who I confessed to offered to write me a ticket and/or lock me up, if that made me feel better.  I just promised I'd bring the chair back in two or three days, and the officer agreed that sounded more practical.  I love my campus public safety officers!

Step 14-16.  Make a template for the leg braces using newspaper.  This is pretty easy if you (14) spray the leg with water so the newspaper sticks, (15) smooth the newspaper out along the leg, and (16) use scissors to cut the newspaper to size.

Step 17.  Lay the newspaper template down on a former fence board and trace the outline with a pencil.  My dad says a pencil always lasts him about 5 minutes in the workshop before he loses it; if he has 30 minutes to work on a project, he'll bring 6 pencils along with him.   Me, I seem to be much more fortunate in hanging on to my good old #2's.

Steps 18-21.  Begin cutting out the leg brace with your jigsaw (18), and then (19) bike on over to the hardware store to buy new jigsaw blades because the only one you have is so #@$ dull it's driving you crazy and then (20) put in the new blades which are better and then (21) finish cutting out that first leg.

Doing this project, which requires a lot of jigsaw work because of all the curves, really made me appreciate my circular saw, which just tears through stuff quickly and noisily (even through extension cords, although I'm getting a bit ahead of myself).  Jigsaws, in contrast, are painfully slow and require a bunch of arm muscle.  All this cutting and lifting and pushing was fabulous work to do in a heat wave (and I mean that; I really love getting a good honest sweat going.   I know most people hate/fear this heat wave we've been having, but I've been reveling in it.)

Step 22.  Check that the leg brace we just cut out really matches the original.  phew! It did!

Steps 23-27.  Use this leg as a template for other leg braces (a wood template is sturdier than newspaper), and then cut out five more legs.  Did I mention that I wanted to make three different chairs?  So six leg braces total.

Steps 28-34 involve making  newspaper templates, tracing the onto pieces of wood, and jigsaw cutting of the six remaining curved pieces, two for each chair.   The other curved pieces of an Adirondack chair are the back support braces behind the seat, the ones that hold the back slats in place.


The rest of the pieces are basically straight (so yay! I can cut them with the circular saw).  Steps 35-38 involve measuring the front legs, the chair slats, the back slats, and the armrests.  Steps 39-42 involve measuring them all again, just to be sure, because measure twice, cut once, and all that.  Plus, my measuring assistant really liked playing with the retractible measuring tape -- and who doesn't?  Measuring tapes are fascinating!


Steps 43-60something (what the heck, I'll say step "67"; I'm losing count here) are to zoom through these pieces with a circular saw.  The arms require a bit of tapering of corners, but the circular saw still works for that job.  At this point, I started to really just "flow" with the work.  No agonizing or decisions required, just pick up the next piece of wood and buzz it to the right length.  This was where the true fun began.
When I was done cutting everything up, I just had a bunch of piles of wood, not very impressive.  It certainly didn't look like enough for a chair, much less three chairs.  But just wait!  It's going to work, you'll see!

If using a circular saw is fun compared to using a jigsaw, using the drill is the bomb.  Wow.  There is just something really, really satisfying about seeing all these pieces come together.  In my head, I was grokking to Bloom's Taxonomy of Knowledge, thinking "I've just done analysis (separating things into their components), and now I'm doing synthesis."   I love Bloom's taxonomy.  

Steps 68-71:  Assemble the seats.  Lay the seat boards down on the leg braces (68), add spacers so everything is even (69), drill holes (70), screw everything together (71).   Steps 72-75 are to do the same thing for the seat backs.

On the first chair I made, I added the front legs before connecting the seat and the back, but on subsequent chairs, I decided this was the wrong order.  So I'd suggest this instead (which worked well on the second and third chairs):  Steps 76-78:  attach the back to the leg braces (position the seat, drill holes, screw things together.

Then attach the armrests to the back, which is like 6 additional steps because getting the screws in deep enough requires making insets with several different drill bits and also a search for a long screwdriver plus taking a bit of a break for cold water because at this point with things going so well, you don't really want to let exhaustion and tiredness cause you to make a stupid or hasty mistake.  

Step 85: Breathe a little.  All is good.

Step 86:  Lay the chair on its side.  Step 87: prop up the legs under the chair so they fit right up against the armrest.  Steps 88-89: drill holes and insert screws into leg braces.   Steps 90-92: Stand the chair up, and drill holes, and insert screws to attach armrests to the legs.  Steps 93-99: repeat on the other side.  Done!


100. Oops.  Except on chair #1 (which is actually a love seat; is that cool or what!?!) I realized I'd cut the upper back brace at the wrong angle.  You know that something is going to go wrong on a multi-step project like this, and it turned out that this one little angle-thingie was the part destined to get me scratching my head.  So I did a bit of futzing and realized that my jigsaw actually allows me to set angles (cool!  How did I not know this before?) and redid the back braces on the next two chairs before I attached them.  More laborious jigsaw work (huff, puff, steps 101-107, maybe).  And then (step 108) a quick trim with the circular saw -- a little too quick because I also trimmed the electrical extension cord.
Whoops!  Need to angle the cut on that back brace,
so it matches up with the arm rests better.
Note the wheel on the front leg -- fab!

As long as we were out getting a new electrical cord (step 109), I decided to also get wheels for the front legs.  Because Adironack Chairs on wheels are just way too cool for words.  yes?  yes?  Step 110, 111, and 112:  trim the legs to the right new length (circular saw back in action), mark the holes and drill them, and then screw the wheels to the legs. 

But after all this fun, voila!  An Adirondack Love seat!  And a pair of Adirondack Chairs!

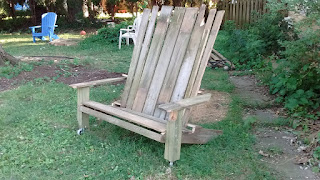
An Adirondack love seat.


An Adirondack Chair
(with the other chair and love seat in the background,
beyond the mulch pile).
My uncle saw pictures of the love seat and wrote, "Congrats on building the Adirondack chairs. They're interesting, and have just a hint of medieval torture in their looks." I think he means that in a good way.

Finally, step 113:  Return the stolen borrowed chair to campus, or rather, have my sons do it.

The cost of these chairs?  $24 for the wheels, $20 for a set of three new-to-us extension cords (snagged off of Craigslist), $8 for a set of jigsaw blades, and $1 for borrowed chair transportation.  The screws,  I had leftover from a previous project, so essentially $0.  That's $53 for a set of chairs that are, if I say so myself, full of character, plus a weekend of incredible woodworking fun.