Pages

Tuesday, January 31, 2012

Unusual uses for canning jars

A cute reference by Dogs or Dollars to the "Cuppow" (a way of turning a canning jar into a beverage cup) got the old cogs spinning.  I'm All For using canning jars (or anything else ready to hand, really) in unexpected ways.  In fact, I wrote recently about how much I've come to love using canning jars to carry my lunch around.

Canning jars are great for storing lots of stuff besides canned foods.  Check out 50 Great Ways to Use Mason Jars, or 10 Uses for Old Canning Jars.  (The first link has more ideas; the second has more pictures).  Most of these ideas are about stuff you can put into the jars -- that is, most of these ideas would work just as well for any kind of jar, really.

But canning jars are special because they have a lid and a ring -- and having these two different pieces means you can swap out the top for something really different.  So here are some MORE ideas for using canning jars -- provided you already have them lying around.

1.  Gift-card lid.
Here's one of the simplest lid-swaps I've done (actually, it's a lid addition).  Using another lid as a stencil, I've cut up a greeting card to put between the (sealed) metal lid and the ring to pretty up a gift.


2.  Funnel lid.

Top view of the funnel jar.
I found a funnel I wasn't using that magically fit right into a canning jar.  (Score!  I love that kind of serendipity).  I cut a larger hole at the bottom of the funnel; now this makes our "one-way" coin jar.  It's easy to toss coins in.  We'll use these coins next summer when we go yard saling: you're looking at my clothes budget, right here!

The beginning of the clothing budget for the year.
3.  Spout lid.
Use a canning lid as a template.
Grab an old salt container.  (My non-miser husband buys name-brand salt; I find that generic brands are better because the paper label around the spout comes off more completely).  Use an existing lid as a template, and cut out a circle containing the spout.  The new jar can be used to pour small amounts of sugar, dry milk, etc.

A canning jar with a spout, for pouring powdered goods.

4.  Beverage lid
And beverages?  As much as I love the concept, I can't bring myself to pay $8 to buy a little plastic lid (sorry, Cuppow!) -- it's against my religion and all that.  I spent a weekend examining the rest of my travel mugs, hoping that something would magically fit (like that funnel).  No luck.  But looking at all the little holes made me realize that three-dimensionality isn't as crucial as I'd first thought.  So I grabbed a can punch and an old lid -- a hammer helped to start the hole. Bingo!
My "new" travel mug, made from 100% old parts.

Beverage lid: view from above.  Success!  Yes!
****
If you're not a canning jar aficionado but you like one of these ideas, you can go "backwards" from a standard canning trick.  Because the lids are the same size, a bunch of my friends who can jam will use glass mayonnaise jars with canning rings and lids. (You can't use mayonnaise jars in a pressure canner).  If you just get your hands on a few rings, then all of these alternative lids would work just as well for mayonnaise jars or many other kitchen jars.  In fact, our parmesan cheese comes in a container whose lid fits my canning jars -- I didn't show that here.  

Monday, January 30, 2012

Wrapping Christmas up

This weekend was time, finally, to put the Christmas decorations away.  Our tree is made of metal, so it wasn't that we had needles all over the carpet -- it's just that the wonder of the lights at night seems to have ebbed.  That, and we've got to make space for the Valentine tree.
The Christmas tree, decorated two months ago.
Our lights go all over the living room and up the stairs to the second floor.  To store them away so they're not tangled when I pull them back out next year, I get a piece of sturdy cardboard and cut little notches in it for the cord plugs.
I'm going to toss the blue box
and use the ugly brown piece of cardboard instead.

Then I wrap the lights around the cardboard, tucking the ends into the notches.
This is what I use the cardboard for -- to keep the cord untangled.

And this is how I wrapped Christmas up.
Here's the stack of decorations, ready to go downstairs, in front of a bare tree.  It's just a little sad and dark now.


Saturday, January 28, 2012

Time In

When you adopt kids out of the foster care system, you learn a lot about alternative forms of discipline.  Some of these kids have been through such rough patches that no ordinary threats make any dent.  Take away their toys?  They've been there, done that, and worse.  Corporal punishment?  You don't even want to know.

Another standard parenting trick (One-Two-Three-Magic) uses Time Outs.  For many kids, removing the children from the situation is enough to calm them down, and the isolation is a punishment.  But for many foster kids who've been in less-than-happy family situations, Time Out is a treat.

So with my kids, discipline often means "Time In".  We fix ugly behavior by spending even more time with the kids, giving them a lot of face time.  It's not good for my own psyche to think that time spent with me is a punishment (hey! I'm not that nasty to hang out with, . . . or am I? hmm . . . ).  To preserve my own ego, I've had to readjust my thinking to tell myself that not all discipline is punishment.

Okay, there is still some punishment.  Both my husband and I are physically active.  When My Guy takes on the "Time In" role, he becomes the army drill sergeant.  He runs the boys.  He has them do push-ups.  They're quivering and sweaty by the end . . . but they've seen both their mom and their dad do the same hard stuff.  J-son wants to be a track star.  N-son wants to go army.  They don't want to get to the point where their dad makes them run, but they're darned proud that they can hack it.

I take a gentler approach.  We fix things.  We organize stuff.  We make dinner.  We do things I like to do, but I drag the kiddos through it all with me.  The formal term for this is "modeling appropriate behavior", but that just really means "showing them how it's done".
Quality Time In:  Cooking with J-son.
And if you think that this idea of "Time In" is just a trick for parents, then you haven't been reading how-to books for managers.  If MBWA (Management By Walking Around) isn't the grown-up version of "Time In", I don't know what is.

It's a heck of a lot easier for me to send my son to his room when he's being disagreeable or uppity than it is to spend time with that Grumpy Gus, but it's that time together that seems to actually change the situation.  I've been thinking about this more generally; there are problem committees and disagreeable paperwork I've been dealing with (or rather, not dealing with).  And, as much as I hate to admit it, Time In has made those situations better, too.

Friday, January 27, 2012

T-shirt quilt update

The t-shirt quilt is now done.  Phew!  When we last left our hero, I was just pinning the t-shirts to the sheet that I used as backing.  For this particular quilt, I decided to add strips of material to the spaces between the shirts.
Here, I'm pinning the strip, good side down,
to the shirts and also to the sheet underneath.
After I sew the seam, I'll fold it up and sew it to the shirts above.

I pinned the heck out of everything.  Then I rolled the quilt up, and sent it through the machine.


After I'd sewed on edge of the strip down, I unrolled the quilt, smoothed everything out again, and folded the strip over the other t-shirts.
Here, I've folded that middle strip up, doubled it over,
and pinned it to the t-shirts above it. 
That gave me my horizontal strips.  I did the same for the vertical strips.  And this was the result.
The finished quilt, with a dog bone nearby.
Not bad, really.

Professional quilters probably don't get as much dog hair on the quilt as I do -- all that rolling and unrolling, smoothing things out on the living room carpet really adds to the quantities of lint and dirt that this baby picked up (and we really did vacuum this year, I swear!)  But I shook the quilt vigorously, and it didn't fall apart.  And the t-shirts give it a nice heft.  Could be worse.

Total cost?
  • The sheet I used was a discarded flat sheet (the bottom fitted sheet had holes in it, but the flat sheet was in fine condition).  Cost: 0.
  • The t-shirts were all free; mementos of past events.  And they were heavy enough (two layers) that I didn't use any batting in between the shirts and the sheet.  Cost: again, 0.
  • It's hard to reckon how much the thread cost; I've picked up a bunch at yard sales and as gifts, but definitely less than $1, probably not even a dime.
So there you have it, a ten-cent quilt.  Dog hair included at no extra cost.

Thursday, January 26, 2012

The all-natural fridge

I'll admit that when I read about a woman who unplugged her fridge, my first thought was not "what a nut!".  "What a nut" was actually my second thought.   My first thought was, "Could I do that?"

It's hard to figure out how to unplug my fridge when I've got a large family that is thoroughly comfy with the modern American lifestyle.  As I've mentioned before, don't-drive-them-nuts is one of my core values.  The thrift has to come under the radar.  Stealth thrift.  Ninja thrift.

So here's a huge wow-are-you-great to Green as a Thistle (see change #78), who did in fact unplug her fridge for nearly a year, and who survived to tell the tale (see her book, Sleeping Naked is Green).  And here's my stealth version:  my kids call it God's refrigerator.  He only turns it on during the winter, but when it works, WOW does it work well!

The  main lesson you learn in Energy Consumption 101 is that making things either hot or cold uses most of our household energy (unless you have a flat-screen TV).  I love my fuel-efficient car, but even if I drove a HumVee, our biggest gas guzzler would still be my home.  I'm a maniac about turning off lights, but the fridge and the dryer are the real energy hogs around here.  So when it's cold outside, I don't make my indoor refrigerator burn those KWHs; I stick my food outside to chill, and then I move it indoors into the fridge.
Leftover squash, cooling off outdoors after a hot meal.

For a bonus, you can turn the fridge into an ice-box, literally.  Fill used jugs or plastic jars with water, stick them outdoors on a cold day, and when they freeze up, move them into the fridge or freezer.  If you're like me, the chest freezer is slowly emptying up from the garden produce and bulk-purchased meats. Fill it up!

For me, I've found that jugs of ice/water at the back of the fridge serve a double benefit.  First, they help to add "thermal mass" (that is, they keep the fridge cold even when unnamed children open and shut the doors several times an hour).  But also, they keep the food I'm storing closer to the front of the fridge.  It's hard for stuff to get lost in the back, which helps keep stuff from going moldy. 

Wednesday, January 25, 2012

Waffle repair waffling-redux

Last fall, my last waffle iron broke.  I tried some really tacky-looking, temporary repairs, but decided they were too cheap-looking even for me.  Several months later, I've reconsidered quite how low I am willing to stoop.
Review of last-semester's syllabus:  The trouble with the waffle iron was the little plastic hinges broke.  I "repaired" them with chopsticks, but called the company that makes my baby for a fix.  I got new hinges, free of charge.  Rejoicing.

Here's the update.  Those new hinges broke, too.  I called again, and I got 2 more sets of hinges, again free of charge.  And each of those broke, too.  I think the problem is that Black-and-Decker expects us to store the thing horizontally, whereas we store it vertically.  And darned if I want to rearrange my life to make little plastic pieces happy.

So we're back to the chopsticks.  They're not shiny chrome or  svelte black plastic, but they're biodegradable, and free, and they keep one more appliance from making its one-way trip to the landfill.

Sometimes being a good Miser Mom just isn't pretty.

Tuesday, January 24, 2012

Mommy Dollar Update

Being far too cheap to pay my kids with real money, about a year and half ago I set up a system of "Mommy Dollars".  To my surprise, this system is still going strong at the home.  Here's J-son flashing his cash:
Our dog plays the role of George Dogington.
Older sisters get their faces on other bills.
And here he is, demonstrating how he maintains his account register at "BoMama" (Bank of Mama).

Tallying deposits and withdrawals in the BoMama.
I think the two secrets to the longevity of this program are (1) a detail-obsessed mom who doesn't mind keeping the system going and (2) a fee for bedtime snacks (this bribe keeps the boys coming back for more).  Hence, bedtime is financial up-date time for us.

J-son's Lava Lamp, left on at night.
Over the holidays, the boys each got decorative lights -- a Sponge Bob lamp for N-son, and a Lava lamp for the stylin' J-son.  (Total cost, $6 at yard sales).  They love the lamps so much they want to leave them on all night.  Their miserly mom, who bought the lamps for a song and a few bucks, hates the idea of leaving lights on.  How do we deal with this conflict of desires?

We deal with Mommy Dollars.  A back-of-the-envelope calculation reveals that running a 40-watt lava lamp all night costs about 4-8 cents, or about 4-8 Mommy Dollars.  If the boys leave their lamps on, I don't yell.  If I grit my teeth, at least I don't show it.  I just charge the boys their fee -- the decision is theirs.  Often, they opt to pay up.

Here's N-son.  On a recent snowy Saturday morning, he decided to pay not only the lamp fee, but also another $40 to watch a movie on TV with K-daughter.  Since he wasn't carrying that much cash on him, he visited the BoMama to withdraw funds.
Paying for Sponge Bob (the lamp and the TV time).
The boys are fairly wealthy for their age; they've both got between $300 and $400 in their BoMama accounts, which they saved up slowly over the course of a year.  Of course if you do the conversion rate in your head, remembering that $100 in Mommy Dollars gets $1 in US currency, the number isn't quite so impressive.

But Bill Gates would say the same thing about my own savings accounts, I'm sure.  

Monday, January 23, 2012

Sew Good!

I am not smart enough about anatomy to know where the cockles of my heart are, but I know they just got warmed.

Look at this cute knitting-needle holder.
A knitting needle holder, unrolled.

Rolled up and ready to travel!
What makes this particular item so cockle-warming is that it's the very first solo homemade project of my very first child.  (Also my only homemade child, but that's another story).

I've tried teaching all of my kids, homemade or no, how to sew.  Here's N-son making t-shirt bags this past summer:
N-son learning to sew
And here's J-son, wearing his project half-way through construction.
J-son is a very manly sewer.
I even co-opt OPK (Other People's Kids):
My niece learns to hem dish rags.  Child labor!
But all this usually requires a lot of what I might politely call "supervision" and what an innocent bystander might call "meddling", "micromanaging", or (more accurately) "nagging".

But I-daughter is all grown up.  She lives two states away.  No adult supervision required.  And all on her own, she found the pattern and concocted her very own needle holder.  Let's take one more look at those beautiful stitches:

She's sew good!

Saturday, January 21, 2012

Bad Gift Exchange Party

Last night we had my favorite party of the year -- the Bad Gift Exchange.  It's become an annual tradition with my girlfriends.  Setting it up is fairly easy:  pick the date, get out the blender, make the muffins.

And we bring our bad gifts.  Many of these aren't really bad, they're just things that belong in Somebody Else's Home.  The cookie shooter.  The  latest Stieg Larson book.  That blue sweater that's not quite her color. A few years ago, I brought a GPS I'd received . . . that was a huge hit among my friends (but as for me, I prefer paper maps).

There are also some doozies, of course.  Some of our favorites:  the glittery, sequined sweaters given to the flannel-shirts-and-work-boots-wearing woman.  The gold reindeer planter.  The statue we still refer to as the "Leper Dog".  This year, the two untouchables were the glittery snowman statue
This photo doesn't do the statue justice,
which is probably the kindest thing to say.
and a set of kitchen stickers.
Apparently, these stickers are very trendy.
Apparently, my friends and I are not.
There's occasionally jewelry -- this year, there was a bunch.  I'm not a necklace/bracelet kind of a person, so I was politely sitting on my hands as one of my friends explained she had a necklace . . . and then she said the words "leopard print" -- so I pounced.
My new leopard-print necklace.  Score!  
We take turns telling stories about our gifts.  Mothers seem to be an amazing source of "not really me" gifts.  But it's amazing how often we find that one woman's trash is another woman's burning passion -- you hear a lot of, "If no one else wants that, I could use it for . . . " Many people leave feeling like they took "all the good stuff".  Even the sequined sweaters and the singing bass have found happy homes.  Actually, even the leper dog eventually found a proud owner -- he was a freaky candle holder, but it turns out he's a great garden statue.

There's a lot of laughter and commiseration over the stuff that no-one wants.  There is a little pleading: doesn't ANYBODY want that Eat & Drink sign?  Could we rearrange the letters to say something else?  Are you SURE nobody wants that snowman statue?  Our friends who don't show up often discover we haven't forgotten them, and they get mementos of the party, too.

We've done this enough that it's changed the way we look at receiving gifts.  More than one of my friends tells a story of opening a positively awful gift and having a genuine smile of joy on her face. With all sincerity, we can exclaim, "Wow! This is great!  Wait until my friends see this!"

We just can't say where.

Friday, January 20, 2012

Talking Trash

Who'da thunk that making less trash would involve having more trash cans?  One commenter wrote on another blog a few weeks ago (I lost the link, darn it) something to the effect that, stores make it really easy to bring stuff home, but nobody makes it easy to dispose of those things properly.

How true.  One of my goals for the year is to figure out how to (a) reduce our garbage pick-up to one can every other week while (b) not driving my family crazy.

Obviously, one way to do this is to bring less stuff into the home.  But since I don't go to stores (and my family does), I have limited effectiveness in this arena, unless I flagrantly violate goal (b).  [I suppose I could try to set a good example, shine with the glow of ecological serenity, and hope that my family is so smitten that they long to emulate my transcendent example . . . but somehow I don't think my pre-teen boys and my vitamin-water-loving husband exactly hang on every word this middle-aged mama utters.]

The other way to reduce the amount of garbage is to re-purpose the garbage.  And that's where the multiple trash cans come into play.

In the very ugly picture below, perhaps you can see a white trash can.  The trash in that can will go into the garbage cans and will count toward the tally of trash.  To the left and right of that can, respectively, are a paper bin (goes to my office for recycling) and a can-and-bottle bin (goes curbside).  Also on the floor is a bag with some stuff for Goodwill, a box for cardboard, and a newspaper box.   The cardboard box is a recent addition; we found a cardboard dumpster 2 blocks from my home, behind the college dining hall.  Recycling isn't perfect, but it's better than landfills. 


But there's more.  Up above there's a glass jar -- that's waiting to go to market with me on Saturday; I'll get nuts deposited directly into that jar.  (We also take back our egg cartons and milk jugs, too).  There's a bag of orange plastic newspaper bags, which we'll use for dog poop.  On top of the orange shoe box is a box with some styrofoam (the UPS store recycles that).  The rest is clutter.  (This area hasn't gotten a lot of love lately.)

All this doesn't even count the "hazmat" box (lightbulbs and batteries) out in the garage, or the compost bucket by the sink.

I'll say it again:  so far, reducing our trash has meant having a lot of trash cans.  Still no violation of goal (b), from what I can tell --- I'm about the only one going crazy with all this here.  And as for goal (a), so far, we've put out only 2 garbage cans this year.  Not quite to goal (a) yet, but getting closer.

Thursday, January 19, 2012

Macaroni and children

Here is a photo of N-son making macaroni and cheese -- not the stuff from the box, but the real thing.
Chopping Peppers
Running the food processor to grate the cheese
Adding the cheese to the pot, one handful at a time.
Cooking with the boys has re-started in earnest.  They each make a dinner one night a week -- or, at least, that's the plan.  Right now, it still takes more of my time to "help" them than it would to make the dinner on my own . . . ugh.  But I'm holding out hope for the future.

And (here comes the proud Mama part), rays of hope burst forth.  J-son has fallen in love with stroganoff (not coincidentally, one of my sister's favorite meals to make when she was a young cook).  It's not that hard to make, and he's getting close to be able to do it on his own.

Even more, when our church started a Meal Chain for a woman we know who's undergoing chemo, both of my boys decided to put their own names down to cook a meal each.  They're proud of what they can do on their own (with a little help from their mom).  And for that, their mom is awfully proud of them.

Actually, you want to know how proud I am?  I'm so proud I'm actually thinking of spending money on this.  I've been eyeballing ChopChop, a really cool cooking magazine for kids.  They keep this up, and I'm digging into the wallet.  And that's no yoke.

Wednesday, January 18, 2012

Address books

This is another one of those geeky organizing posts.  I've been reading lovely blogs about people organizing their kitchen cabinets and laundry rooms and desks, and I'm all for that.

Ah, but the address book.  Who spends an afternoon organizing the address book, taking before-and-after photos, and sharing THAT with friends?  Who else, but me?

Actually, I don't really have before-and-after photos, because this is an area of my life that I don't really let get messy.  I keep my information neat so I don't have to freak.  But it's easier for me to keep these lists neat because they are "compartmentalized", so to speak.

I carry frequently-used addresses and/or phone numbers around in my paper planner.  As always, I try to organize by how I use things, not by what they are -- in the case of my address lists, that means alphabet be damned.   This part of my planner is only a dozen pages long.  And here is the order those pages appear (some categories have more than one page):
  • Family, Immediate.  
  • Family, Removed.
  • Family, Out-Laws (they used to be In-Laws, but divorces happened).
  • My departmental colleagues.
  • Other mathematical colleagues.
  • Former Students.
  • Near Friends (Church).
  • Near Friends (Non-church).
  • Far Friends.
  • My Sons' Friends.
  • Local businesses I call regularly (pest control, library, dairy, etc).
  • Party list.
Some of these pages, I'll write out by hand -- I write the names in ink, but the addresses in pencil, so I can erase and update as needed.  Other pages, I have on my computer, so I can just print out a copy for myself or for others, as needed.  (For example, after Christmas, my daughter and step-daughters write thank you notes to their aunts and grandfather.  It's easy for me to send these gals the family addresses, because they're all in one e-document.)

I know, I know, I know that almost nobody cares about address lists the way I do.  Why on earth would I even write a blog post about this, boring people with all these byzantine details?  I guess because this gives an example of how someone can be a hyper-organized person even if she doesn't follow "the rules".  

With your address book -- or with any other part of your life -- you don't have to let some commercial product squeeze you into its mold.  You don't have to alphabetize, or have 26 pages, or link everything to an email address or a cell phone number, in order to have control over the information that you need, when you need it.  You just have to think about how you live your own life, and then organize that information so that it serves you.

Tuesday, January 17, 2012

Lunch jars

How to pack lunch to take to the office?  I've been pondering that question for a while.  Here have been some of the choices, and also some of the why-I'm-not-quite-happy with those -- and also my happy recent discovery.

Sandwich bags (and really, for me, any plastic bag is a sandwich bag.  Pantyhose bags, coffee filter bagss, chocolate chip bags . . .  I'll repurpose just about anything).
  • Advantages: cheap, all-too-abundant (unfortunately).
  • Disadvantages: Can't hold soup or other left-overs; things get smooshed by my laptop and books.
Plastic containers.
  • Advantages: convenient size, good for left-overs.  Don't usually leak.  I can freeze leftovers in them if by some miracle there are lots of leftovers despite my voracious boys.  The husband acquires the plastic stuff through his non-miser purchases of lunch meats (unless I do preventative shopping), so we have lots of them.
  • Disadvantages: Sometimes leak.  I'm a bit nervous about heating things up in plastic, too.  Some people don't worry at all about plastic touching their food; some people are plastic puritans; I'm somewhere in the middle but sliding surely leftward.  
My momentarily organized collection of pyrex and plastic containers.
Pyrex bowls.
  • Advantages: These can go in the freezer AND in the microwave.  
  • Disadvantages: They leak.  Soup is right out for transportation, unless it's frozen.  And, although they are fairly durable, when they do break, they cost money to replace.
Thermoses and metal lunch boxes.
  • Advantages: they don't leak, or so I've heard.
  • Disadvantages: For me, the big one is I'd have to go buy them -- that's why I have no photos.  A close second is that they're single purpose.  I'm searching for something versatile, that doesn't mind playing multiple roles in the kitchen.
I was fretting about lunch wrappings again the other night once again as I was cleaning out the dishwasher and packing up that night's soup . . . when what to my wondering eyes should appear, but a clean canning jar, and 8 bottles of beer!  Well, okay not really the bottles of beer.  But the canning jar, yes.

Canning jars.
  • Advantages: I have a lot of them lying around.  I've tried using them for about a week now, and they haven't leaked yet.  They hold just about anything except sandwiches (pictured below are noodles, lentil soup, and homemade yogurt).  They're microwavable.
  • Disadvantages:  Not good for the freezer.  Not good for sandwiches.
Lunch in 3 jars:
leftover noodles, homemade yogurt, and leftover lentil soup.

In fact, the lunch jar experiment has proved so successful that this past weekend I tried my hand at homemade yogurt for the first time.  (Big nod to Frugal Girl here).  It worked!  yay!!

Canning jars are not going to be right for everyone, of course.  They cost a bunch up front (maybe close to $1/jar new).  I've read reports of thrift shops selling them for 20¢ a piece, but my local so-called-thrift shops charge 78¢ each -- and that's even without lids and rings.  If all you're going to use them for is lunch, it might make as much sense to thrift-shop-purchase a thermos or lunch box, depending on your situation.

But for me, I have piles of jars around -- I'm finally at the point where I'm getting them from friends and family.  For me, this isn't a "go out and buy" solution; it's a "gratitude for what I already have" solution.  And gratitude, contentment, even delight -- that's a great combination to take to lunch each day.  Yum!

Monday, January 16, 2012

T-shirt quilt construction

My daughter's t-shirt quilt.
Over the winter break, I started in earnest on my next t-shirt quilt.  I wrote earlier about a quilt I'd made for my daughter.  Here's a picture of that first quilt; I constructed it out of her parent's t-shirts, trying to follow (more or less) a rainbow pattern.

With that quilt, I obviously didn't worry abut things lining up exactly; it's a bit of a crazy quilt.  The t-shirts themselves are the only "batting", and even so, it's a very heavy quilt.

This next quilt I'm making is going to be a gift for a guy who organized a bunch of college picnics.  (He doesn't read this blog -- if you know who he is, SSHHH!!!!  Don't tell him!).  Because it's a gift and it's intended for display, it's going to be a lot more formal.  I also don't get to pick-and-choose the colors; the t-shirts are going mostly in chronological order.

Here's how I'm starting the new quilt.  This whole process took about 3-4 hours so far (not counting gathering the t-shirts, which is another story).
First, I laid out the t-shirts on a sacrificial sheet.
The sheet will become the back of the quilt.
For now, I'm only working on getting the general layout right.  
The next step makes a huge pile of rags -- t-shirts are great cleaning rags!   I cut off any part that had a seam.  I tossed the necks away but kept the rest of the scraps (sounds like cooking a bird!).
To prepare each t-shirt, I cut off the neck, the sleeves and the bottom.
(Really, I'm trying to avoid lumpy seams).

The cast-offs:  A giant pile of rags.
Note the shoe, for size comparison.
After I trimmed each t-shirt, I laid it back on the sheet in the right place.  I folded over the top and the left edges, and I layered them like shingles.
Here's a close-up of the folding over method of layering t-shirts.
If this were my kid's quilt, this is how I'd construct the quilt.
For each t-shirt, I fold over the top side and the left side.
Then I layer the t-shirts on top of one another like shingles.


Here's what it looks like at this stage.
Notice that the top left corners look pretty nice.
The rest is still wrinkly -- smoothing comes later.
After this I got tired and wanted a break.  The nice thing about this method is I don't need to do any pinning until right before I start sewing.  To pack up the project, I just rolled the sheet up,

folded the roll over, and put it all in a pillow case.

When I unroll it, everything will be in the right place still.

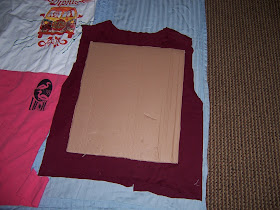
But in fact, as I thought about it, I decided that for this particular quilt, I wanted less overlap than the "shingled" look.  Drat.  More cutting.  I got out a piece of cardboard to use as a stencil.  I double-checked that I wouldn't be cutting off the edges of some of the logos, but also that it would fit on each t-shirt.


Since pinning things takes a lot of time I didn't want to spend, I got out my favorite heavy dictionary.  The weight held the cardboard in place, and then I trimmed off the excess t-shirt material.


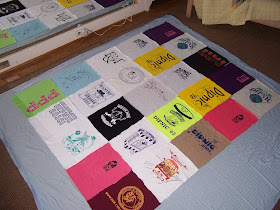
Laying everything out once again, I think this looks a lot nicer.
The quilt ready to pin.  I'm going to add strips of fabric
between the t-shirts to act as a border,
and also to give people a place to sign their names.
And that's about how far I've gotten so far.  I didn't show pictures of pinning everything down, but I've done that now.  Sewing comes next!